User interaction
It is time for some user interaction. Watching circles move on their own just isn't that satisfying. You want some direct control. There are many ways to accomplish this. You could use webcam input, microphone input, even the serial port. However, for now we are just going to focus on the two simplest ways to allow user interaction: keyboard and mouse.
Keyboard input
First up, keyboard input. You might have noticed that a keyDown() method was added to the source code from the last chapter. Much like setup(), update() and draw(), keyDown() is one of a few special functions (more properly called virtual functions in C++ nomenclature) which we can override to let our app do something based on a particular event. In our case we're not doing anything too crazy, just two boolean toggles to control what should be rendered. If you hit the '1' key, you toggle on or off the rendering of the source image. If you hit the '2' key, you toggle the rendering of the Particles.
To check for special keys, you use event.getCode() instead of event.getChar(). Special keys include the arrow keys, shift, esc, ctrl, etc. For example, to check for the right arrow, you do this:
Oh, and notice the call to console(). This is a Cinder function which returns a class we can send text to, and it's a handy, cross-platform way to print out notes and debugging information. It behaves just like <a href="http://cplusplus.com/reference/iostream/cout/">std::cout</a>, and in fact on OS X it is std::cout. However on the PC it calls some special code which prints each line to the Output window of Visual C++, or to a system-wide log viewable using the tool DebugView from Microsoft. You can also send many Cinder types directly to it, using something like:
Moving on, let's imagine as an example you are creating a first-person shooter style camera. You will want to respond to key events by storing the state of a specific key. A good way to do this is to make a few boolean variables like isMovingForward and isJumping. If the 'w' key is pressed ('w' is how you move forward in default FPS controls), set isMovingForward to true. When the 'w' key is released, you set isMovingForward to false.
In your camera code, you would use these key states to determine what direction to move the camera. This will give you much better responsiveness than moving the camera only on keyDown() events which are periodic instead of constant.
Mouse input
Cinder offers five different mouse events which it can listen to. You can check for mouse button press and release, much like with the KeyEvents. You do this by overriding mouseDown() and mouseUp(). Additionally, you can check for left, right, or middle mouse button clicks as well as checking to see if any modifying keys were held down during the click.
As an example, here is the code for checking to see if the right mouse button was clicked while the shift key was depressed.
In addition to button press state, you can also check for move and drag events. If the mouse is in motion, mouseMove() will fire every frame. If you happen to also have a mouse button pressed, mouseDrag() will fire instead. Finally, while we don't make use of it in this tutorial, Cinder supports mousewheel events via the mouseWheel() function.
The next thing we are going to add to our tutorial is the ability to influence the Particles based on their proximity to the cursor. The first thing we want to do is use mouseMove() to get and store the cursor position, which we will keep in a new member variable called mMouseLoc.
You will probably notice that while you are dragging the cursor, mouseMove() isn't triggered. This is because you have entered the domain of the mouseDrag() event. But what if you want to keep track of the mouse position even while dragging? Well, you could duplicate the code you have in the mouseMove() function, or simply tell mouseDrag() that it needs to call mouseMove().
Now that we are keeping track of the cursor position, we need to get that data to the Particles. Well, we can't talk to them without going through ParticleController first, so lets add mMouseLoc as a parameter for ParticleController::update(). Don't forget to make the change in your .h file. If C++ is new to you, this is a common source of compile errors - forgetting to make the required changes to both the .h and .cpp files.
We want to do the same thing to Particle::update(). And while we are poking around in the Particle class code, go ahead and add an additional Vec2f that we will call mDirToCursor.
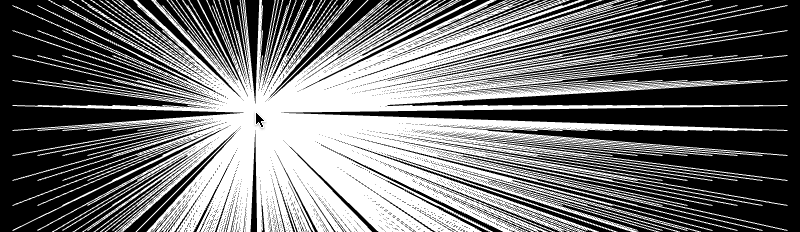
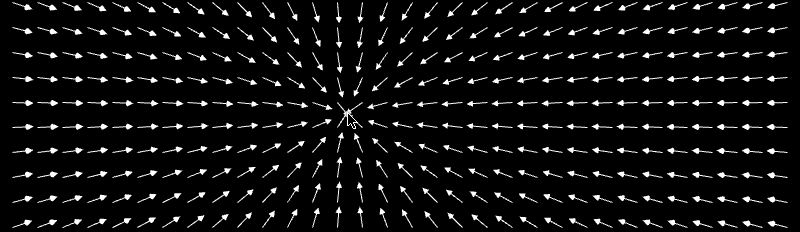
Think of each Particle as having an arrow which always points towards the mouse. This is what mDirToCursor will represent. To find out the mDirToCursor, you take the cursor location and subtract the Particle's location. This will give you a vector that points from the Particle all the way to the mouse. If we draw those vectors, it would look like this:
That is a bit more than we need. Instead we want a normalized vector, which is a vector that has a length of 1.0. We also need to account for the possibility that the mouse location and Particle location might be equal. If we try to normalize() a vector that has a length of zero, the computer will cry. Cinder has a solution to that problem. If you are unable to guarantee that the length will always be greater than zero, you can use safeNormalize() which will do that check for you.
If we cinder::Vec2::safeNormalize "safeNormalize()" mDirToCursor and run our project again, it will look like the image below. The length of the arrows is exaggerated to make it easier to see them. Also, you can use gl::drawVector() which asks for the start and end of your line segment and then draws the line and corresponding arrow head. The following code block shows how you would draw the arrows.
There are a couple points related to the Vector library we would like to mention. First, <a class="el" href="namespacecinder_1_1dx.html#a24280fb2d2f00e51bcc2e015121130b9" title="Draws a vector starting at start and ending at end. An arrowhead is drawn at the end of radius headRa...">gl::drawVector()</a> takes two Vec3f but we have been dealing with Vec2f all this time. The quick solution is to just turn the 2D vector into a 3D one by adding a z component and setting it to 0.0f.
The other nice thing about C++ and vector libraries in particular is you have the ability to overload operators. An operator would be something like + or *. In most other programming languages, you can only use these operators with built-in types. However in C++, you can overload these operators to allow you to use them with objects if you choose. The Cinder vector library allows you to add, subtract, multiply, and divide vectors using the corresponding operator. In the Particle::draw() method shown above, we are taking a Vec2f called mDirToCursor and multiplying it by the arrowLength. Then we add that amount to mLoc.
It is starting to get really interesting! There are definitely a lot of good tangents to explore here. If you aren't thoroughly excited after reaching this step, then you might be dead inside. This mess of pointy arrows is positively overflowing with potential.
Iteration 1: Mouse Distortion
We start by changing the resolution of the Particle grid. We double the number of Particle's along each axis to end up with 4x the amount we were using prior. This brings us to 19200 Particles which is perfectly fine for realtime performance. For the accompanying images, we are actually using 480,000 Particles and not surprisingly, the frame rate will suffer.
To help keep the frame rate zippy, we are going to switch to rectangles instead of circles because there are fewer vertices to draw. We'll use Cinder's built-in rectangle class, and we'll use the version that takes floats called Rectf. There are a few different ways to construct a Rectf. We are going to use 2 pairs of variables. The first pair represents the x and y coordinate of the rectangle's upper left corner. The second pair of variables will represent the lower right corner.
I want to apologize for using the word radius to describe the size of this rectangle. If it helps, you can think of it as a circle but with a triangle fan resolution of 5.
Now we introduce a local Vec2f called newLoc which is based on the current location but has an offset added to it. Our offset will be the unit vector representing the direction to the cursor. We multiply it by 100.0 because an offset of 0.0 to 1.0 is not that noticeable.
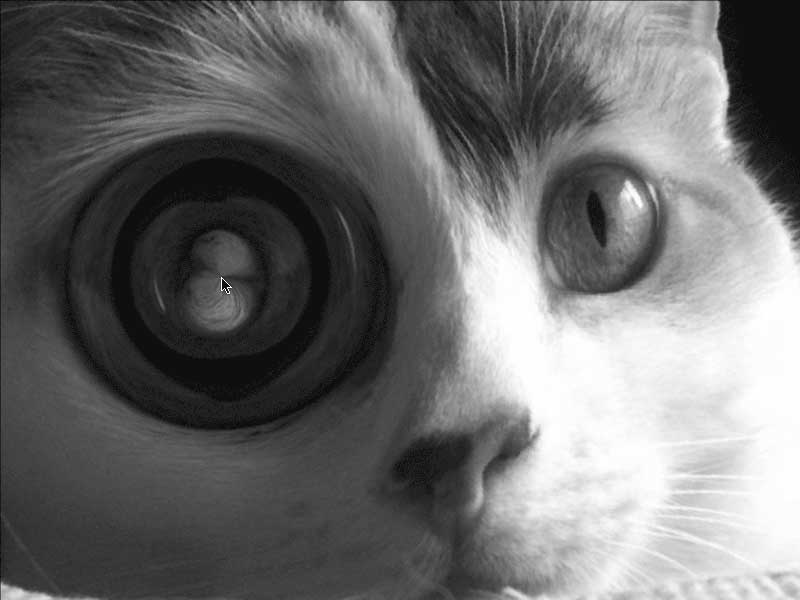
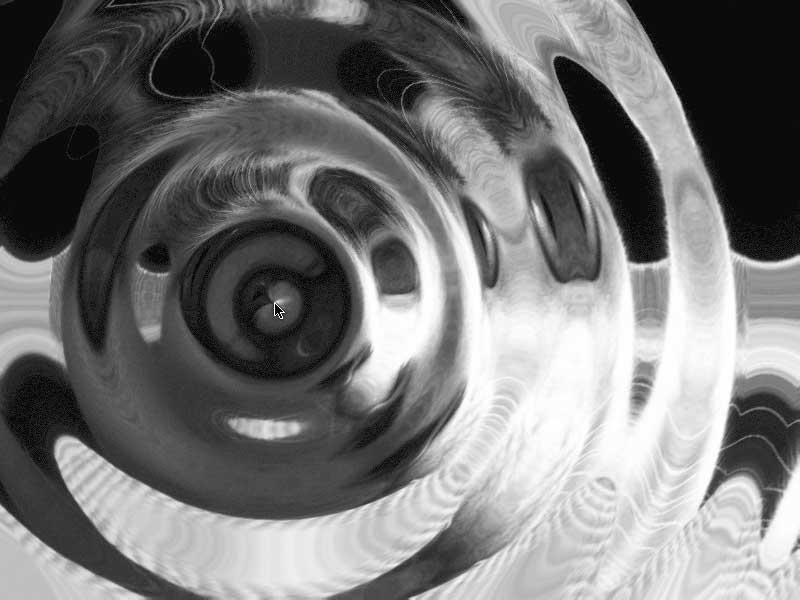
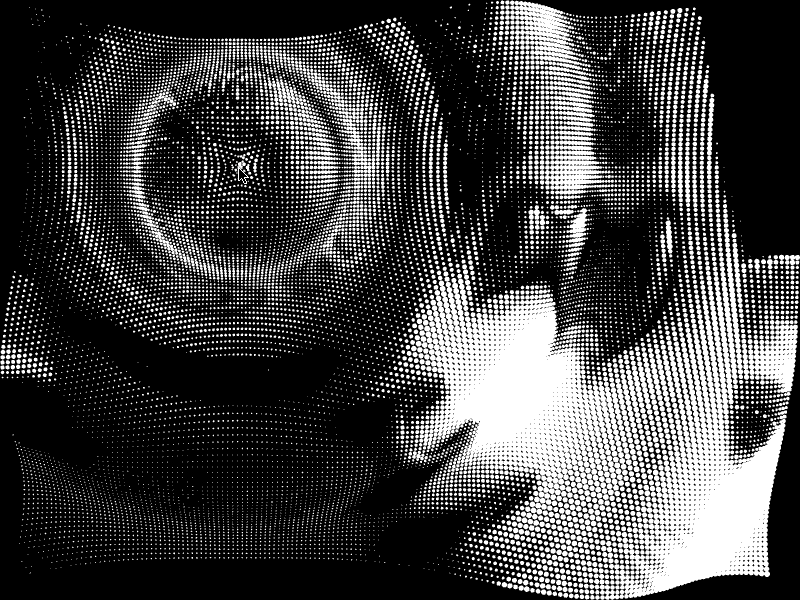
We add those constrain() calls because we want to make sure the new location isn't outside the bounds of the Channel. Now, instead of using mLoc to get the corresponding Channel value, we use newLoc which will give us an offset value. We are left with a strange bulgey lens effect centered on our cursor. Poor kitty!
Iteration 2: Wavey Pixels
Another baby step. We are going to put back some of the sin() and time based code we had used earlier. The time variable is just a scaled version of getElapsedSeconds(). The dist variable is a scaled version of the length of mDirToCursor vector before we normalize it (because if we wait until after we normalize it, it will have a length of one). Finally, sinOffset takes the sine of time plus dist and scales it up 100x.
The time is there to oscillate our wave and the dist is there so we can create concentric oscillations emanating from the cursor position. Below is the Particle's entire update() method.
Iteration 3: Wavey Particles
Time to go back to the Particle circles. We have commented out the color and are now back to drawing the Particles as white circles of variable radius.
Instead of using the newLoc to retrieve the corresponding Channel value, we are going to switch back to using mLoc. The one main change for this iteration is we are going to use the sinOffset to warp our mDirToCursor vector.
Then, in our Particle::draw() method, we draw the circle at the original mLoc but we add the scaled mDirToCursor.
Congratulations! We have just created an incredibly simple and naive code-based representation of the wave/particle duality of nature and light. Let's continue. Now that we understand how to control our Particles, we can start to fine tune their behavior in Chapter 4.