Documenting Cinder
As an open source project, the Cinder community welcomes anyone interested in helping to document the library and/or write guides to help other developers progress their understanding of the library. There are many different ways to contribute to this documentation and this guide is meant to walk through those different avenues. You may want to take a look at the Building Docs guide before reading this one.
Documentation Anatomy
The Docs Generation Process
Cinder documentation generation is a 2 step approach;
- Exporting source code documentation
This step uses Doxygen to generate a series of XML files, one for each namespace, class, struct, and interface in the library and a master tag file (cinder.tag) which encapsulates the relationships between all of those files.
- HTML generation and integration with guides
The Cinder documentation framework includes a mechanism to add documentation to a class' specific documentation page, as well as a method to easily link to specific pages of the documentation from your HTML files. The integration happens via a Python script, generateDocs.py, that parses all of the information and exports an HTML directory, ready for consumption.
Docs File Structure
This is a brief overview of the new docs/ directory structure. Names in gray specify dynamically generated files and folders that you won't see unless you generate the docs.
- doxygen/ - for doxygen related files and configuration
- cinder.tag (generated by Doxywizard) - contains library source file data and relationships
- Doxyfile - Export configuration for Doxygen/DoxyWizard
- html/ (generated by generateDocs.py) - contains final HTML and asset files
- htmlsrc/ - contains all HTML source files, including CSS, JavaScript, Mustache templates, and images
- _assets/ - contains all CSS, images, and JavaScript files used throughout the docs
- _docs/ - contains all supplemental class documentation
- _templates/ - Mustache/HTML templates used by the Python script to generate docs with
- guides/ - source files for all guides
- index.html - markup for the index page
- reference/ - source files for reference pages
- libs/ - Python libraries used by generateDocs.py
- stylesrc/ - contains style source files, including Stylus (which is the preprocessor of choice) source files and a gulp config file.
- xml/ (generated by DoxyWizard) - all of the files containing data for each source file documentation page.
Documenting Source Code
All of the inline comments within the Cinder source code are turned into documentation in the Doxygen export step. For instance, if you open up a header file, you will commonly see block comments above each method that look like this.
[from Surface.h]
/** \brief Constructs asynchronously a Surface from an images located at \a path. The loaded Surface is returned in \a surface.
**/
//! Returns the width of the Surface in pixels
If you choose to contribute to the inline source documentation, a subset of doxygen markdown is supported, including but not limited to:
- Adding inine links:
[The link text](http://example.net/) - Code Block Indentation
- \a <word> in italics
- \p <word> for monospace font
- \see { references }
Note that not If you want to do anything complex, it's highly recommended that you instead contribute to external documentation, as described below.
External Documentation
To write supplemental documentation and guides for the docs, there is a separate process. All external documentation is written in HTML and lives in the htmlsrc/ directory. You can refer to the Docs File Structure for specifics. Unless you are contributing to the overall documentation site markup, you will be mainly concerned with the _docs and guides directories. The _docs directory includes markup and additional assets for class descriptions, while the guides directory includes all of the Cinder guides' markup. Before we go into the specifics of writing each type of external docs, let's look at the <ci> tag.
The <ci> tag
To assist in bridging the gap between the Cinder source reference pages and the supplemental HTML markup, we've created a special <ci> tag. This tag is used to specify any content within the supplemental documentation HTML that needs to be linked into the source reference, as well as to provide a way for reference pages to link back to our guides.
These are the use-cases for the <ci> tag:
To generate a link into a source documentation page
When writing guides, you may frequently want to reference specific source code constructs, such as a class, namespace, function, or enum. Since the docs are dynamically generated it's prohibitive to worry about the specific linkage. The ci tag makes it easy to link to a specific source code reference entry.
For example, if you were writing a guide for FBOs and you wanted to link to Cinder's gl::Fbo class, you could simply write:
An <ci>Fbo</ci> represents an OpenGL Framebuffer Object.
When the file is processed through the docs generation script, it will find and link a tag to the correct HTML file; it converts the Cinder-specific <ci> tag to a standard <a> tag, like so:
An <a href="../../classcinder_1_1gl_1_1_fbo.html">Fbo</a> represents an OpenGL Framebuffer Object.
When using the <ci> tag this way, you can either specifiy the target between the opening and closing tags like this:
<ci>Fbo</ci>
or if you want to link to it using a different label than the one given, you can use the "dox" attribute:
<ci dox="Fbo">This is an Fbo</ci>
In some cases it may be necessary to avoid ambiguity by offering the fully qualified symbol name (including its namespace):
<ci dox="ci::gl::Fbo">This is an Fbo</ci>
Take a look at this test file to see a list of different combinations.
To add a description to a specific class, interface, or struct
To avoid polluting the Cinder library header files, you can write additional class descriptions in a separate HTML file and have it injected into the actual class' description. We do this by placing all of your content into a ci tag, giving it an attribute of prefix and setting the dox attribute to the class that you are documenting.
<ci prefix dox="cinder::Fbo">
	<p>FBOs are used for doing off-screen rendering ...</p>
	<!-- continue writing content here -->
</ci>
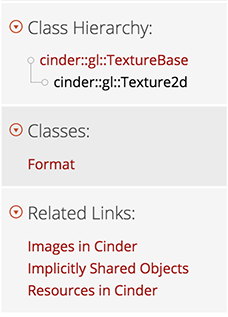
To link a guide to a specific class reference page
We've also made it easy to link your guides from relevant classes. For instance, the guide for using images in Cinder discusses gl::Textures, Surfaces, and Channels. To associate that guide to those specific class pages, all you need to do is add these ci tags with a seealso attribute to the HTML page head:
<head>
	...
	<ci seealso dox="ci::Surface" label="Images in Cinder"></ci>
	<ci seealso dox="cinder::ChannelT" label="Images in Cinder"></ci>
	<ci seealso dox="cinder::gl::Texture2d" label="Images in Cinder"></ci>
	...
</head>
If you want your guide to link from all classes in a namespace, you can simply specify the just the namespace. This is useful for broad guides pertaining to bigger topics, like audio.
<head> ... <ci seealso dox="cinder::audio" label="Audio in Cinder"></ci> ... </head>Once those specific class reference pages are generated, a link to the guide will appear in the class detail side bar under "Related Links".
Writing Guides
To write a guide to be included in the Cinder documentation, follow these steps:
- Create a new directory within the docs/htmlsrc/guides directory. The name of the directory should be short and descriptive (ex: audio, mac-setup, cinder-blocks, etc).
- Create a new index.html file in your new directory and copy the content from the HTML file at _start-here/start-here.html. The file includes all of the CSS and JavaScript linkages that are used in the generated HTML directory. This is not essential, but will give you an accurate preview of how your guide will look once integrated.
- Write your guide in HTML. You can include your own JavaScript and CSS if you'd like.
- If you have multiple pages, create a config file.
- Add meta keywords that can be used for searchability within the docs.
- Add any
<ci> seealsotags to classes that may be relevant (This can also be part of the config for multiple pages). - Make a GitHub pull request
The config file
For your convenience, you can optionally include a config.json file for if your guide has multiple pages. This file allows you to specify the pages in your guide for subnavigation, specify meta keywords for every page in your guide, rather than specifying these for each individual page.
This is an example taken from the Path2d guide:
{
	"data":{
		// keywords for finding this guide via search
		"metadata":
		{
			"keywords": ["path2d", "shape2d", "bezier", "curves", "path", "lines"]
		},
		// subnavigation for every page of the guide
		"subnav":[
			{
				"label": "Part 1",					// label for the subnav link
				"link": "part1.html"				// link for the subnav link
			},
			{
				"label": "Part 2",
				"link": "part2.html"
			},
			{
				"label": "Part 3",
				"link": "part3.html"
			}
		],
		"seealso":
		{
			"label": "Path2d Guide",				// label for the seealso link(s)
			"dox": ["ci::Path2d", "ci::Shape2d"]	// classes to be linked from
		}
	}
}
Helpful tips
Using the pre tag when writing code blocks
For code blocks, we use the Prism syntax highlighter. It allows you to style your code blocks based on their language. This is the proper markup for Cinder C++ code blocks:
<pre><code>
	//... write some code here to be highlighted
</code></pre>
By default, C++ is the specified language for code blocks. If you want to override that, you can use one of the following supported language classes:
language-c++(default)language-markupFor HTML and XMLlanguage-bashlanguage-javascriptFor JavaScript and JSONlanguage-python
You can write inline HTML code by using the <code> tag by itself:
<code>gl::ScopedGlslProg</code> is a scoped glsl shader.
Special CSS
In addition to any styles included in the Foundation 5 framework, there are a few classes that may be commonly used when writing documentation, which can be found in stylesrc/stylus/helpers.styl:
Image helpers
.centerfor centering images.shadowfor adding a consistent drop-shadow throughout the guides.roundedfor adding rounded corners to images (best for application windows)
Including WebGL
We encourage you to use whatever web technologies that will make your documentation as helpful as possible, including the use of WebGL. To do so, you should be able to write your WebGL sample entirely in a separate file and save in the same guide directory. Then you can embed your sample into an iFrame. All assets within the guide's directory will be copied over.
This is all you have to do to embed a WebGL iFrame into your markup:
<iframe src="cube.html" width="640" height="400" frameborder=0></iframe>
Note: Due to file system security measures, WebGL samples that rely on asset loading will not show up when viewing your guide via the file system. You will have to spin up a local server to view it, which should be pretty common if you are writing WebGL in the first place.
Running the Generation Script
Generating all of the docs takes a few minutes, which can be a hassle when testing out a specific guide. Here are a few tips for running generateDocs.py
Running the default script by default generates every page of the documentation. Run it like so:
python generateDocs.py
You can run the generator on a specific file by passing the source file as the first argument:
python generateDocs.py htmlsrc/index.html
To regenerate a specific directory of files (such as a suite of guides that live in the same directory), you can specify the directory that you want processed:
python generateDocs.py htmlsrc/guides/opengl/
When generating a source file documentation page, by default, all of the html files will be generated so that the script can link up referenced pages. To skip over that step, you can use the -s flag.
python generateDocs.py xml/namespacecinder.xml -s
By default, debug log messages are ignored. To view all logging messages, the -d flag can be useful for debgging errors:
python generateDocs.py -d